I have been asked by my friend Pearlin,to give a tute on how to make a bottle holder that I usually attach to the interior of all my bags..Seam stresses who are into bag making will definitely benefit from this tute.Most of us carry at least a small water bottle with us in the bag whenever we go out shopping...Chances are that a little leakage can happen and things inside can get spoiled.. Here's a way to make the bottle stand upright thus reducing the risk of leakage..( don't blame me if you don't close the lid properly!:):)...)
Here it goes..Its very simple..Once you get the hang of it its gonna be a piece of cake!!..
Cut a long strip of fabric, 2 and a half inches wide and 34 inches long.....the smaller piece in the picture was meant for another purpose ..I forgot to remove it while taking the snap..so pls ingore the smaller one..

fold the strip lenghtwise into two and sew along the raw edge..

Attach a safety pin to one of the shorter edges and push it inside with the help of the pin...


as you reach the other end you can see the right side coming out with the pin at the end..

here it is completely out.remove the pin.

iron the strip to flatten it out and insert a long piece of elastic through one of the open short edges..

bring it out at the other end.

tie the two ends to form a circle of a small diameter(about 2 inches will be enough).. .. the idea is to make it smaller than the circumference of a half liter water bottle.this will help hold the bottle in place upright...make the knots twice so that it is strong enough.

push the knot inside so that it will not a be hindrance due to bulk while attaching to the edge of the lining later in the bag making procedure.

attach the raw edge of the elastic ring to the side of the interfaced lining with a pin and sew a few times and its done..(see the pic below)
A small tip for you:--We want the bottle to stand upright ..so it should have a support from the bag bottom as well as from the side ring...(you can see how it stands upright on the ring thus made , in my previous post on Vintage inspired bag'..)but for the support from the bag bottom,the bottle should be touching the bottom of the bag..for this purpose, before attaching the ring onto the lining, lay the lining piece flat on a table...Lay the bottle on the lining(perpendicular to the bottom seam of the lining) so that its bottom lies just in line with the bottom seam of the bag...Then mark the position of the ring a little above half way up the side seam of the lining...You may now sew the ring's raw tips onto the lining..Now the bottle will be getting support from the side as well as from the bottom..

Hope my tute makes some sense.. Its the first time I am attempting at one.. If you have any doubt pls don't hesitate to write to me and ask.
With warm regards, Mini


 White towels with quilted strawberry tops and frills along the edges.Can be hung from towel hook using the ribbons drawn through the eyelets at the top..As well could be hung from a towel rod the way we usually do .
 Back view of the towels
 A few strawberry pin cushions I made using the left over red fabric .The leaves were then stitched with DMC green pearl cotton.. The white spots are in seed stitches and in a few,in french knots. So yummy and juicy !! Aren't they?I adore them a loooot!!
 Hope all my friends too had a creative week!

 Interior having zipper pocket,bottle holder, key bunch holder etc..my new linen mobile pouch with rose flap can be seen lying at the bottom..
 Back Side of the bag
 The bird panel
 Bottom side of the bag
 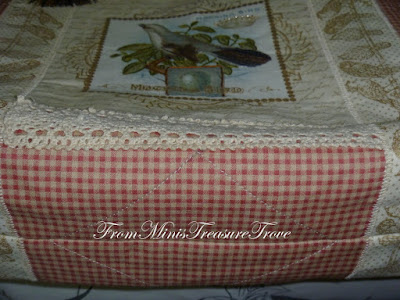 I had some vintage checkerd fabric with me with which I wanted to sew something that would be cherished forever..I had madly fallen in love with a bird panelled fabric I had purchased from my fav textile shop waiting to occupy the focal point of some vintage project.. I cut out the panels and started planning to attach them to various projects like cushion covers and finally for a change on this bag which I had decided to sew with the checkerd fabric.. The panels for both the sides were made slightly stiff using light interfacing and then attached to the center using simple machine zigzag.The lace on the top and bottom edges of the panel had a vintage look which I found to be pleasantly coordinating with the colour scheme.The bird and the leaves were then highlighted using simple stem stitch all along the body and tail feathers..A few beads adorn the crown on the panel.
  The two pairs seen below have been made with two inch accent pieces

 A couple of pairs of Christmas Themed Pillow Cases..I know its much ahead of next Christmas season.. But couldn't resist sewing a few using this lovely bright Poinsettia fabric.